Some information on casting
.
.
Green sand casting is probably the most common type of casting used in home foundry. The great thing with green sand is it's totally re-usable, after a casting is shaken out just add a little water, a little clay if you've been casting iron, and it's ready to use again!
Green sand consists of clay mixed with sand, I also put some wall paper paste in mine as well. However this will go mouldy and make the sand smell, it doesn't bother me, but my wife hates the smell.
.
.
The finer the sand, the finer the finish on the casting, I use a mix of silver sand (from a garden centre) and bentonite clay which is very sticky. I also came accross some very fine sand on the top of a sand dune on a trip to the sea side. This I've mixed with the silver sand aprox 50/50, and I'm very happy with the surface finish I can achieve on my castings.
One day I will get around to trying my "home clay" by drying it and grinding it into powder to allow it to mix well with the sand, with bentonite I use about 8% clay (by volume) with the sand. Other clays that aren't so sticky will need more like a 15-20% mix.
.
.
Some sand comes out of the ground with a reasonable clay content ready to use, you will find this for sale at foundry suppliers, however unless these are local, the shiping costs will be high due to the weight.
Green sand has just enough water in the mix to allow it to bond together and no more, too much water wil cause a poor surface finish on the casting, or if it's very wet, the metal can be blown back out of the mould by the superheated steam generated when the molten metal hits the wet sand.
.
.
I'm gettin a bit "creaky" these days, so working on the floor to make my moulds means I ache for a week! A good moulding bench makes life a lot easier, both for storage and for making your moulds.
.
.
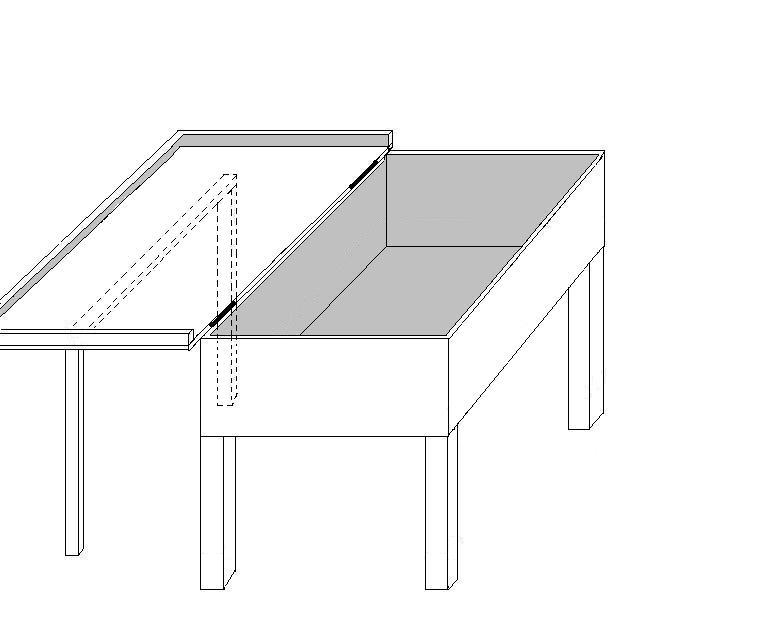
Moulding bench (Click on the picture for a larger view)
.
.
The drawing above shows the idea of my moulding bench. I can not claim this was a great brainwave, I found a dumped parts washer, and with a couple of simple modifications this was what I ended up with!
.
I have put a plastic sheet in the bottom of it to keep the sand moist, this is large enough for the four sides to overlap each other across the top of the sand. I then put my sieve and other tools on top to hold the overlapping sheet in place sealing the sand in and close the lid, this stops the sand from drying out.
.
When the lid is open, removable legs are placed near the middle of the lid, not the outside edge, this is to give firm support to the flask as it is rammed up.
The edge of the plastic sheet near the open lid is laid over the lid, and a wooden board that's a reasonable fit inside the raised edges around the lid is placed on top of trapping the sheet. The plastic sheet on the other sides are then clipped to the container to keep them out of the way.
The flask (moulding box) is then "rammed up" on the board on the lid and any sand that doesn't end up in the flask is easily brushed back into the container.
.
.


(click for a larger view)
This shows my bench in action If you're interested, this is
a cast iron crucible mould
ready to close up and pour
.
When I shake out a mould after casting, I put it on this board and dig out the soft moist sand and which goes straight back with the rest. The baked up sand around the casting sits on the board and the casting is removed and put to one side.
I then sieve the baked sand through a gardening sieve back into the container, and if it needs it, sprinkle a little water on it ready for the next time.
I find this gives me a very firm working area with almost no sand getting spilt, it's easy to roll the flask over or lift up a full flask to move near the furnace as it's already at waist height or above.
.
.
Flasks (moulding boxes)
.
Something is needed to contain the sand for our moulds, these are called flasks and can be made in a variety of styles and ways. A simple piece of pipe can be used if you're casting with lost foam as its not neccessary to open the mould up to remove the patern. Pipe is often used as a flask for investment casting as well, this is something I've just started experimenting with, I'll post something about it as soon as I have some results.
.
The flasks I mainly use are made of wood, the most basic type consists of two parts, the drag (the bottom section) and the cope (the top section). Although it's not uncommon for three or more sections to be used, these would be used when the patern is split into sections and each section is able to locate with its adjoining sections (usually with dowls). As each section of the patern is rammed up in its part of the flask, the next section is fitted and this section of the flask is rammed up until you get to the sprue to pour the metal into. This allows you to cast more complex patterns which wouldn't be able to be drawn from the sand due to undercuts, detail etc.
.
To keep this simple though, I am only going to talk about a basic two part flask.
I make my flasks from scrap wood, it's quick, simple and cheap! Old pallets work very well and are free! They can be fun to get apart, but it's worth the effort. With care a flask will last well, but eventually with general abuse and metal getting spilt on them, they die. So I don't see the point of creating a masterpiece of carpentry, also it's simply not neccessary and often detrimental to the job we're asking them to do!
.
A patern is made as smooth as possible and then painted or varnished to seal it and prevent the moulding sand from sticking to it, the last thing we want to do is to prevent the sand from sticking to the flask! The whole idea is for the sand to stay in place, we need to lift the cope up to gain access to remove the patern, cut in any gates, the mould will then need moving from the moulding bench to the area where it will be poured. A good bond with the sand and the sand not shifting in the flask are essential.
A smooth painted flask will make it neccessary to either put a groove or a rib on the inside of the cope to help keep the sand in place. A flask made from rough finished wood, with nothing sealing it will allow the sand to stick to the whole surface and stay in place.
.
With larger flasks, sometimes I do put a rib around the inside, another method which works very well is to build the flask with a taper on the sides of the cope.
The two ends should be vertical to allow you to fit the aligning pins or whatever form of "cope to drag" locating device you decide to use. However, if the sides are wider at the top than at the bottom, when the sand is rammed into it, it will form a wedge which will prevent it from dropping out. Make the bottom of the sides the same width as the drag, and make the two ends rectanglar and the same width as the top of the sides to allow the cope to be rested on its side when you open the flask.
.
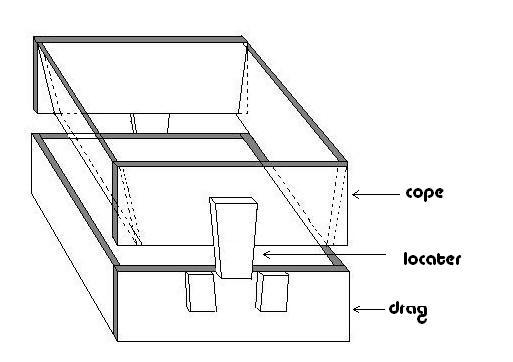
This rough sketch should give the general idea
.
It's not a good idea to turn the cope upside down as the sand might well fall out then! But I find this set up works very well, I can honestly say I've never had a "drop out" since I''ve been casting, just about everything else that could go wrong has gone wrong at one time or another, but never a drop out!
.
.
Ramming a mould.
.
.
I'm going to keep this pretty basic, the whole moulding/casting process starts off very simpley, but then gets more complex as your castings get more complicated, you'll just have to pick up as much knowledge as you can as you progress!
Ok. you've got your sand, you've made a moulding bench, you've made a flask or two and are ready to cast something!
.
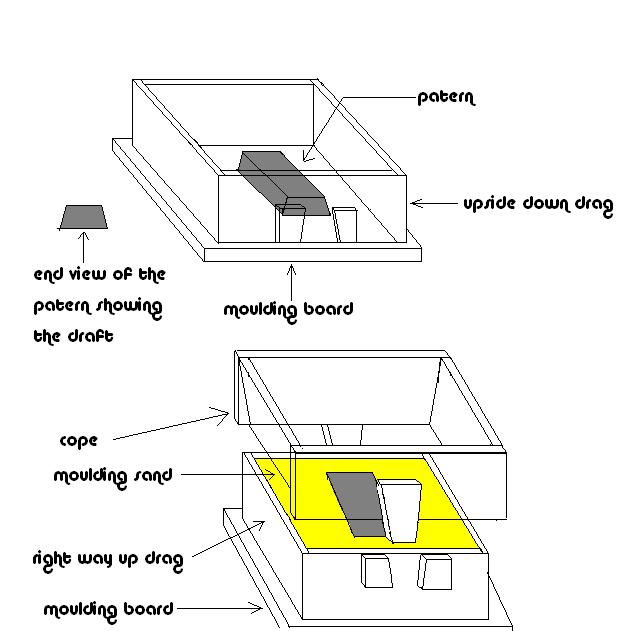
A pattern needs draft to be able to be removed from the sand without damaging the cavity we want left there. If you look at the sketch below you should get the idea, every vertical surface must be wider at the top than at the bottom, this means as soon as the pattern is lifted slightly, it no longer is in contact with the sand so can't do it any damage as it's removed.
.
.
.
Click on the sketch for a larger view
.
.
. Place the drag upside down on a moulding board, put the pattern as shown in the sketch. I always sift the sand onto the pattern with my gardening sieve as it allows an even coating with no compacted areas. Some people sprinkle parting powder over the pattern first, I don't bother. If the pattern is smooth and sealed I find it usually comes out fine. If there is an area where the parting powder can settle with more thickness, say in a corner somewhere, it will prevent the sand from getting there and you will probably end up with a defect in the casting in this area.
.
Once you have a reasonable thickness of sand over the pattern, you then need to ram it in place. If your pattern has detail sticking up at different levels, you might have to build up around the pattern in stages. If the sand isn't packed very firmly around every part of the pattern you will get a poor finish on the casting.
The grains of sand need to be "shuffled" around to close the gaps between them as much as possible, this is done by by ramming at different angles, it's surprising how good a finish you can get with green sand if your sand is quite fine and this is done.
.
Once the whole area over the pattern is firmly packed to the sides of the drag, you can now start to fill it up. I now usually just grab handfulls of sand and press it in firmly with the heels of my palms and my knuckles, you can keep working with the rammer, but it's slow and I get impatient! Make sure the sand is firmly against the sides of the flask to hold it in when the flask gets moved. As long as there are no soft spots as it fills up you should be fine. If the sand is too tightly packed in, it looses it's ability to "breath", possibly trapping gasses when the molten metal fills the cavity. Not firmly enough and it can either fall out, or shift as the cope is rammed up.
If you ask 10 people how to ram up a flask you will probably get 10 answers with a lot of variations between them! I'm not saying this is the best way to do it, simply the way I do it!
.
Over fill the drag, press it all down firmly, then I use a straight strip of alli. in a sawing motion to level the sand off with the wood of the flask.
Now, with smaller flasks my sand is good enough to pick the drag up and turn it over putting it back on the original moulding board, but the accepted practice is to place another moulding board over the drag so the sand and flask are sandwiched between them then turn the whole deal over.
The top board is now removed to reveal the nicely packed sand and the top of the pattern.
If you can see any defects in the sand around the pattern, you can now fill these in using a flat blade or similar to smooth the surface and press the sand into place. Brush off any loose sand, and make sure none of the sand overlaps the edge of the pattern, this must be scraped back, any sand overhanging the pattern will break away leaving a ragged edge when the pattern is removed. The main surface doesn't need to be perfect as sand in the cope will "mould" itself to whatever shape it's rammed into, just the area around the patern needs to be firm and good.
I have a very soft makeup brush (a blusher brush my wife informs me) which is invaluable for shifting loose particles of sand or distributing parting powder around.
I use proper "bought" parting powder, talcum powder can be used instead, but you will need to use a slightly thicker layer. This needs to be sprinkled over the whole face of the drag, I use a plastic kitchen shaker, the type of thing used for icing sugar or flour. Putting some powder in an old sock works, but it seems to go everywhere when I tried it. I then use the makeup brush to spread it around, cover any thin areas, brush it away from any corners etc. where the sand will need to go.
The parting powder creates a barrier to prevent the sand that will be rammed up in the cope from joining together with the sand in the drag. Without it we would just have a solid block of sand that would be impossible to separate the two halves to remove the pattern.
.
Place the cope in place, now it needs to be determined how the metal is going to get into the mould. The hole this is poured down is called a sprue, this is formed in the cope with a piece of wooden dowling, plastic or metal pipe, anything that will leave a nice smooth hole.
.
.
More to come