The purpose of this page is to look at some basic methods of melting metal, keep it simple!
.
Anything you do from this site is at your own risk!
.
Take an ordinary fire place, light a coal fire and off it goes. The hot gasses from the fire go up the chimney heating it up. This encourages the hot gasses to go up the chimney faster, fresh air is drawn into the fire area to replace the hot gasses going up the chimney, this supplies the air to keep the fire burning.
The opening of the fire place is much larger than the fire area itself, so the majority of this air being drawn in, doesn't go through the burning fuel, but simply replaces the rising hot gasses to go up the chimney itself.
.
Most people who've had an open fire know the trick of holding a sheet of something over the opening of the fire place, just leaving a gap at the bottom. By doing this, all the air being drawn into the area must pass through the burning fuel, giving it a lot of oxygen, and it roars away!
I always used to get my open fire going using this method, especially if the wood I was using was damp.
By holding a metal sheet over the opening, the fire will build up in its intensity, the hotter the chimney gets the faster the hot gasses will rise. More fresh air will get fed through the burning fuel making it burn very hot indeed! Keep this going for too long and you will start to melt the brickwork.
As you can imagine, if a crucible of say brass was placed in this fire it would melt with no problems.
.
Build this fireplace away from the house (saves burning the house down) from higher temperature bricks and morter, with a deeper area for fuel to burn. Put a nice tall chimney on it, and a better air inlet system, and you've got a Cupola furnace!
The taller the chimney, the more updraft it will generate, this will draw in more air which boost the fuel's output, therefore hotter metals can be melted in it.
But most of us simply don't have the space or indulgent enough neighbours to do this, so we resort to a mechanical blower to give us the required air flow.
So, all we need is a fuel, some air, and something to mix these together in that won't melt down at the temperatures we will be operating at and a match to start it all off!
Most people will start their casting hobby with zinc alloys or aluminium, and perhaps progress to brass and bronze.
Once this has been accomplished, you're better off building something like The Artful Bodger's Waste Oil Furnace, or one of those highly expensive gas burning thingies that some other people play with(very wealthy people!), or a cupola or whatever.
How simple can metal be melted? Most zinc alloys will melt in a saucepan over a good gas cooker, I have to point out that when I did this, there was a lot of mumbling about divorce lawers and who would get the dog etc. I must admit, it did leave a slight odour in the house!
.
So let's go outside and play. Probably the simplest furnace is a hole in the ground. Yes really! When was the last time you set the soil on fire? (Don't do this if you live in a peat area).
Dig an over sized, tear shaped hole, in the point of the tear, put in an old piece of say, exhaust pipe for an air pipe, this is available for free from anywhere you can get an exhaust fitted, or just look at the side of a bumpy road.
.
Sift the soil you've dug from the hole to remove any stones, these tend to blow apart if they get too hot. Plaster the soil in front the air pipe to make the hole round again, with the airpipe leaning over so that the bottom of it will be in the finished hole, and the top will be to one side of the finished hole. If you can find a piece of pipe with a bend towards the botton, it will go nicely into the hole, if not, cut it at an angle to allow the air to be blown into the botton of the fire we will light in the hole.
You might have to dampen the soil down to make the job easier, but don't make it too wet. If the bottom of the hole is smaller than the top so the sides slope outwards, it will help prevent the soil from collapsing back in.
How big is the hole? well this all depends on how much metal you want to cast! If you have a finished hole around 8"-9" dia x 16" deep, this will do you for around a 2 pint crucible burning charcoal or coal (smokeless coal only).
.
For wood, your hole will need to be a little bigger, around 10"-12" dia, any old pine offcuts work very well. If you ever need to melt a larger amount of alli. than you can get into your furnace, a hole in the ground can be dug to any size you need.
Now simply put some fuel in the hole, add a little air and light it. Once it's burning well, turn the air off, then top up the hole with fuel. Put the crucible in when it will be about level with the top of the hole and put more fuel around it until all's level. Now turn the air on again and wait for the metal to melt. If necessary, turn the air off, lift the crucible out to add more fuel before putting the crucible back in and turning the air on again.
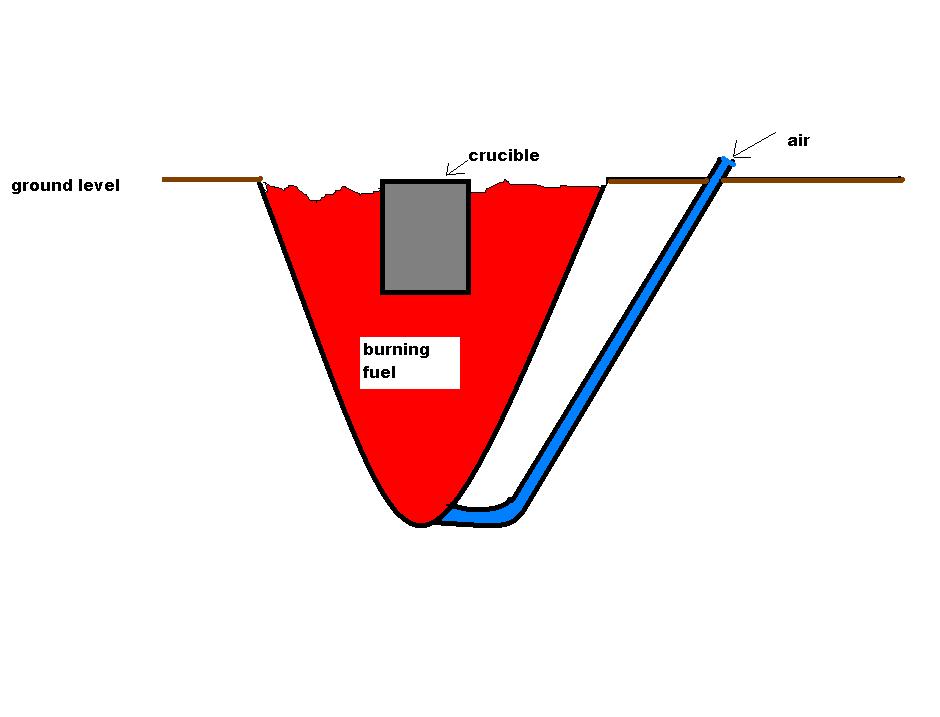
A simplified impression of a hole in the ground
Click on the pictures for a larger view
.
When's a hole in the ground not a hole in the ground?
.
If you have a large bucket, small oil drum etc. Make a hole in the side of it a couple of inches up from the bottom to feed the air pipe in sideways rather than from the top, and fill the bucket with sifted soil just like the hole, taper the sides in the same way and Hey Presto! A hole in the ground, not in the ground.
.
Safety
Before we go any further, one safety issue. If the ground is wet, it's been raining or whatever. The fire won't be a problem, but if any molten metal gets spilt it could be very dangerous! The metal is far above the temperature for boiling water, so if it lands on any moisture, the water under it will instantly boil causing a rapid expansion of steam. This will blow the molten metal everywhere, it's like an explosion!
This is not something to do unless the ground is fairly dry!
.
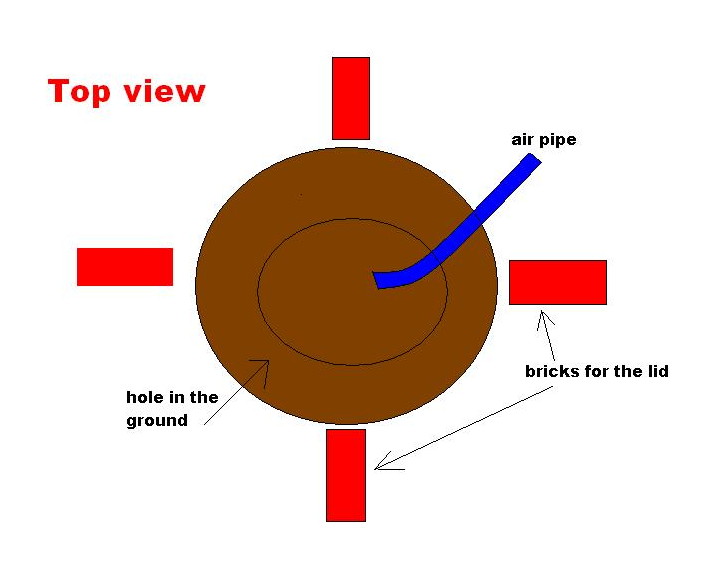
Now a lot of the heat generated will excape from the top, so a lid would improve things. If three or four bricks were placed, half buried, in the soil around the top of the hole and a lid sat on these, the sides of the hole wouldn't collapse every time the lid was touched.
Fire will escape from under the lid, so safe areas can be created by packing soil between the bricks except for one gap to act as an exhaust port, BE CAREFUL!
.
What to use for a lid? a metal plate if you've got one? how about one or two of the light weight building blocks (celcon?), although you'll find these will melt eventually. It just needs to be something to partially block the heat from blowing out. Remember, you will need to lift it off again when it's hot, give this some thought.
.
The air must be blown in the pipe, the shorter the pipe is, the less the resistance will be. It doesn't take very much for alli., brass will need a little more. A hair drier will do the job, one of those supercharged hair driers for burning paint off is good as well, they already supply heat into the equasion!
.
A hoover that can blow will provide far more air than you need, but if the hose doesn't point exactly into the air pipe, less air will be supplied.
If someone is throwing out a condensing tumble drier near you Grab It, pull it apart and remove the plastic base, this will supply you with a motor and twin fans all ready to use (once you've covered up any exposed wires etc.) Cut away any surplus plastic and you've got a very quiet, powerful blower.
You just want anything that will blow air down the pipe, whats laying around?
.
.
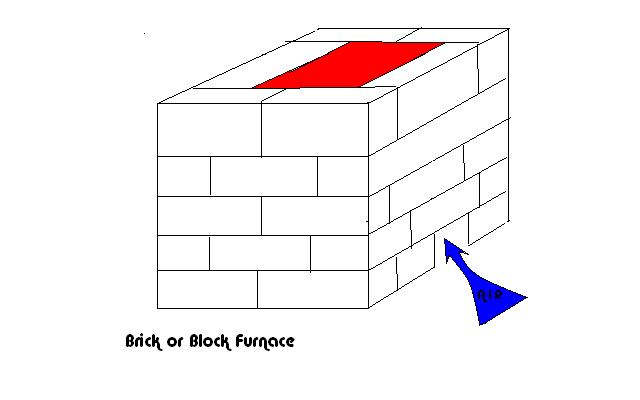
For melting zinc, alli or brass, some old bricks laid on soil with more soil between the joints will do the job, leave half a brick out of the bottom row for the air to be blown in and just build a square furnace whatever size you need it. Make sure the bricks are dry, if they're too wet, the steam generated when they are heated can blow them apart. The celcon(?) blocks will do as well. They will melt! but if you have a pile of them left over from a building job, well at least you've now got a use for them.
.
Click on the picture for a larger view
.
.
None of these methods are long term, both the bricks and blocks will melt, your hole will fall in or become a mini swiming pool! However you can keep digging holes in your garden forever for a free furnace big or small, burn old pine and it's all for free (almost, don't forget the cost of the blower electric, where have I heard that before?).
But if you just want to "give it a go", an old stainless steel saucepan as a crucible, a hole, some fuel, a blower and you're off!
.
The Baby Furnace is probably the next step in furnace building for nothing, or pretty damm close to it. Beyond perhaps building a bigger version of it, you're starting to spend some money!
.
Be Safe Though, whatever safety equipment you wear/use will never be enough! Don't even aproach any type of furnace without welding gauntlets as a minimum, and no synthetic clothing! Look out for yourself!